upload product images to uploads sub folder woocommerce
Majority uploading files to your WordPress media library allows you to upload a large number of files or files with big file sizes without the pains of trying to use the WordPress built-in upload functionality. Merely while this process can definitely brand your life easier in certain situations, it'south not quite as simple every bit just uploading files via FTP. You'll need to complete a few added steps if y'all want those files to actually be bachelor within your WordPress media library. Below, we'll take you through the full procedure from start to cease.
When Is It Helpful to Bulk Upload Files to Your WordPress Media Library?
The regular WordPress media library upload functionality is perfectly fine as long as y'all're non trying to upload:
- Files with large file sizes (some WordPress sites have a max upload size as low as 2MB by default)
- Large numbers of individual files (think in the hundreds)
But in that location may come a time when you demand to complete one of the to a higher place deportment. And in those situations, majority uploading files to your media library via FTP offers a much amend solution than trying to use the built-in media library upload tool.
Why Can't You Just Upload Files Via FTP And End In that location?
Information technology's totally possible to bulk upload files via FTP without completing any additional steps. The trouble only arises if you want those files to be available inside your WordPress media library.
See, once you upload a file via FTP, it's live on your server. That is, you could link to it directly and the file would load. Merely while you lot can link directly to the file, it won't appear in your WordPress media library unless you complete a few boosted deportment to annals the uploaded file with WordPress.
So if you want the files you majority upload to actually appear in your media library, you need to complete the post-obit process:
- Upload the files to your uploads folder via FTP
- Utilize a free WordPress plugin to register the files you uploaded with your WordPress media library
Below, we'll have you through all of the steps in detail. You don't demand any specialized knowledge to complete the process – merely follow forth with the screenshots!
How to Bulk Upload Files to WordPress Media Library
In order to bulk upload your files to the WordPress media library, y'all'll need a few tools and pieces of data:
- The FTP account details for your host – we'll show y'all how to find these for your Kinsta account. If you're using a unlike host, you'll demand to become those details from your own hosting dashboard.
- An FTP program – a piece of software that allows you to upload files to your host. FileZilla is a good gratuitous option, just you tin choice another FTP program if yous'd adopt.
- Add From Server plugin – this free plugin helps you to register your uploaded files to your media library.
Step 1: Connect to Your Website via FTP
To get started, you'll need to connect to your site via FTP or SFTP (understand the difference between the two hither). SFTP is just brusque for Secure FTP. Kinsta exclusively uses SFTP, only another hosts operate on FTP still.
Remember – you'll need an FTP program to do this. We'll utilise FileZilla in our screenshots, simply you can use a different FTP program if yous'd like.
To really connect, you'll demand your FTP login details (specifically SFTP for Kinsta). If you're using Kinsta, you can find these details by going to the Sites > Your Site > Info in MyKinsta.
In the SFTP/SSH department, you'll demand the host, username, password, and port.

Now, you lot accept all the information y'all need to connect via FTP. If yous're not using Kinsta, you should be able to get this same data from your host.
Armed with your SFTP details, go back to your FTP programme and enter them every bit follows:
- Host – your host proper noun preceded by "sftp://". For example: sftp://35.224.70.159 . Additionally, some FTP programs allow you to specify the SFTP method in a carve up dropdown. You can view a guide for such programs here.
- Username – from your Kinsta dashboard
- Countersign – from your Kinsta dashboard
- Port – from your Kinsta dashboard

Once you've entered the data, click the Quickconnect button and FileZilla (or your FTP programme of selection) will handle the residual.
Subscribe Now
Pace ii: Upload As Many Files As You'd Like
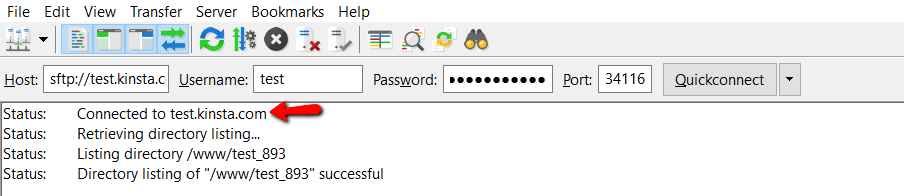
At this bespeak, yous should exist connected to your site via an FTP customer. Y'all can ostend this past looking for the Status: Continued to yoursite.com message:
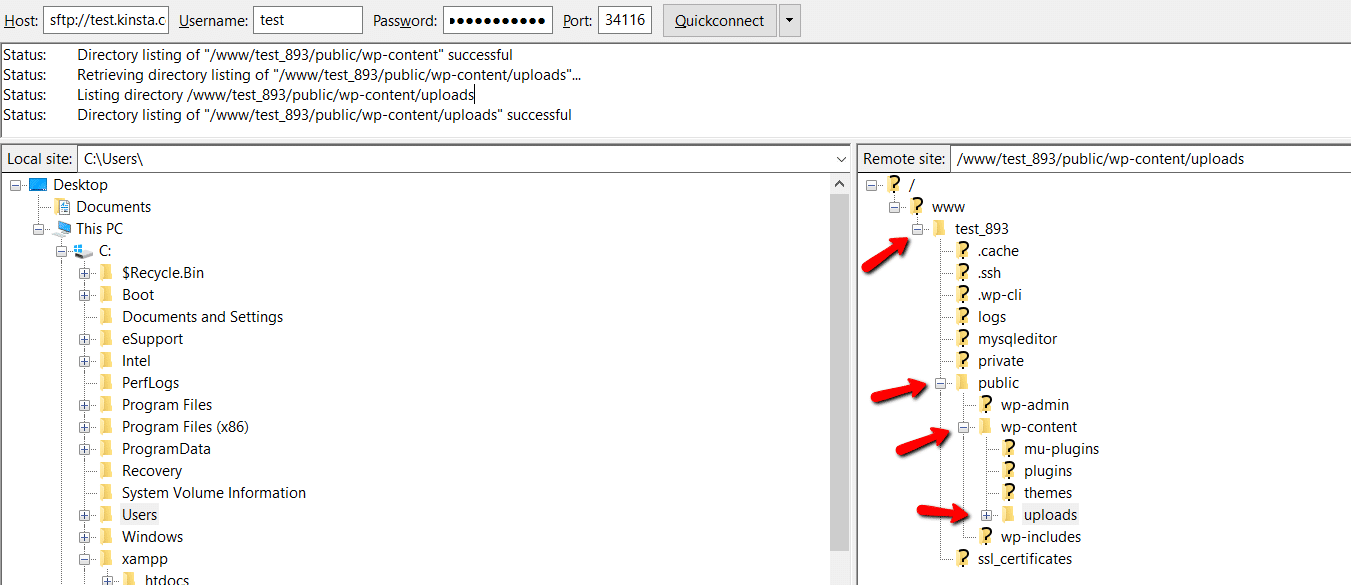
Now, you demand to upload your files to the uploads binder in your WordPress site. To do that, expand the folder structure of your Remote Site tab in your FTP programme past clicking the + buttons. Y'all can encounter the file path to follow in the screenshot below:
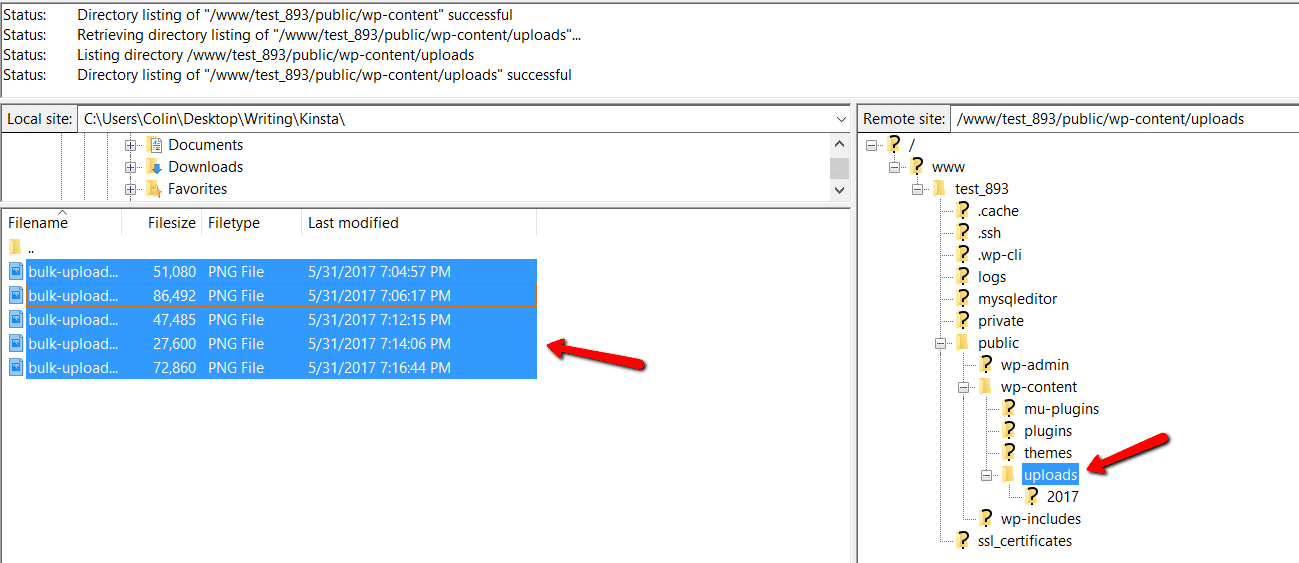
Now, you can navigate to the files you'd like to upload in the Local Site tab of your FTP program. All you need to exercise is drag those files from the Local Site side to the Uploads folder in your Remote Site:
Depending on the size of your files, it might take some time for them to upload. Simply other than waiting for the uploads to complete, you're now finished with this stride.
Footstep 3: Annals Your Newly Uploaded Files to the WordPress Media Library
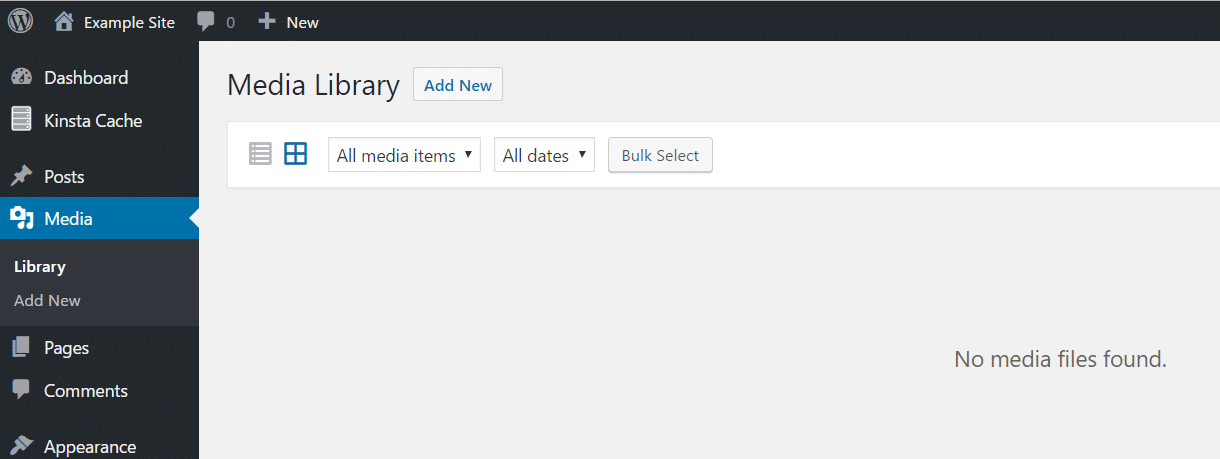
One time the FTP uploads cease, your files are live on your server. But if you lot go to your WordPress site's media library, you'll notice that the files are nowhere to be seen:
To bring those files into your library, you need to install and activate the free Add From Server plugin.
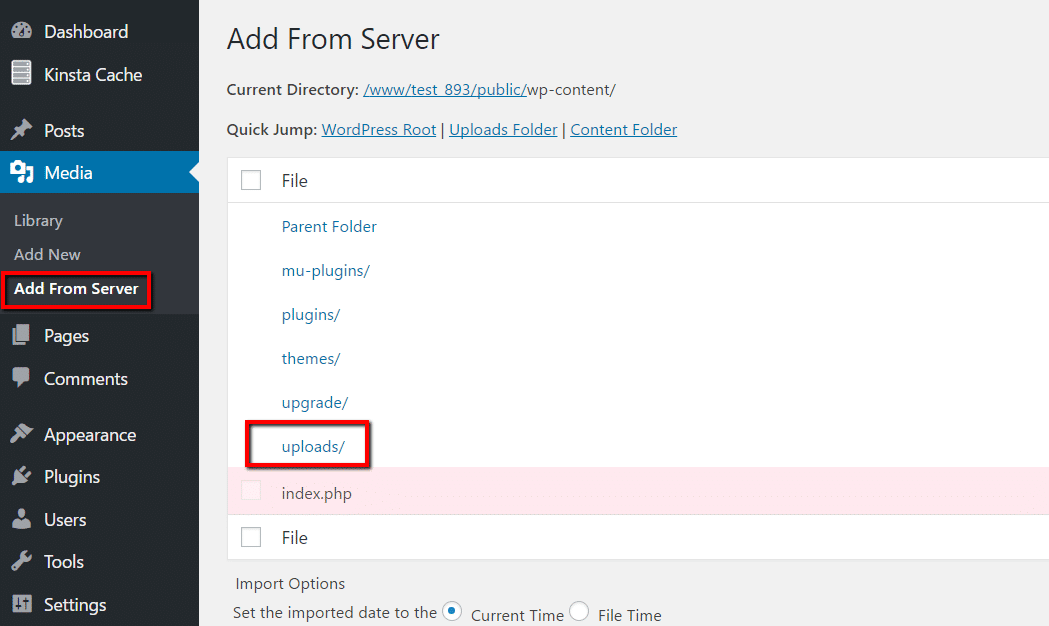
Once the plugin is activated, you can navigate to Media → Add From Server. Then click the uploads folder in the listing:
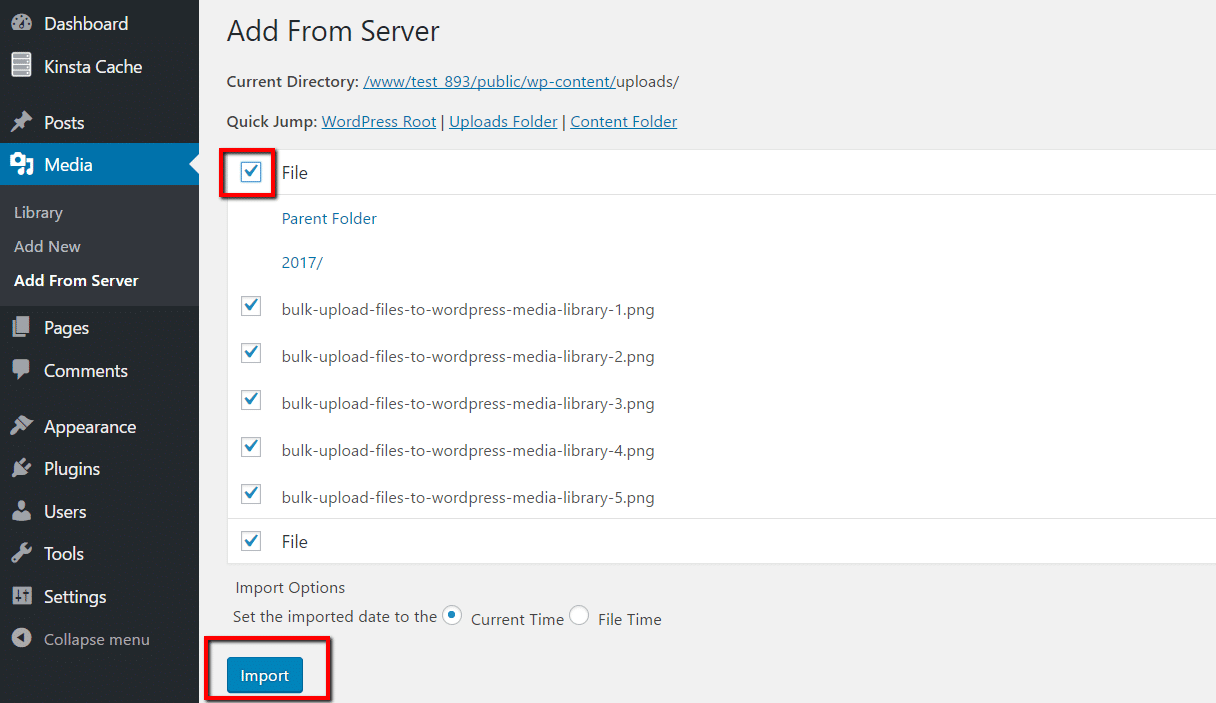
At present, y'all should encounter a list of the files y'all just uploaded via FTP. Assuming you want to import every single file, you can just tick the checkbox to Select All (if not, you can always select individual files). Then, click the Import button at the bottom:
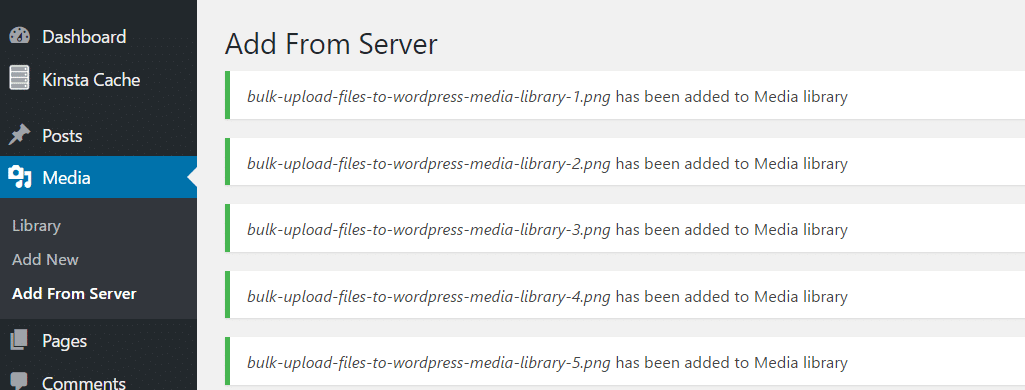
After clicking the button, y'all should run across a success message for each individual file at the top of your screen:
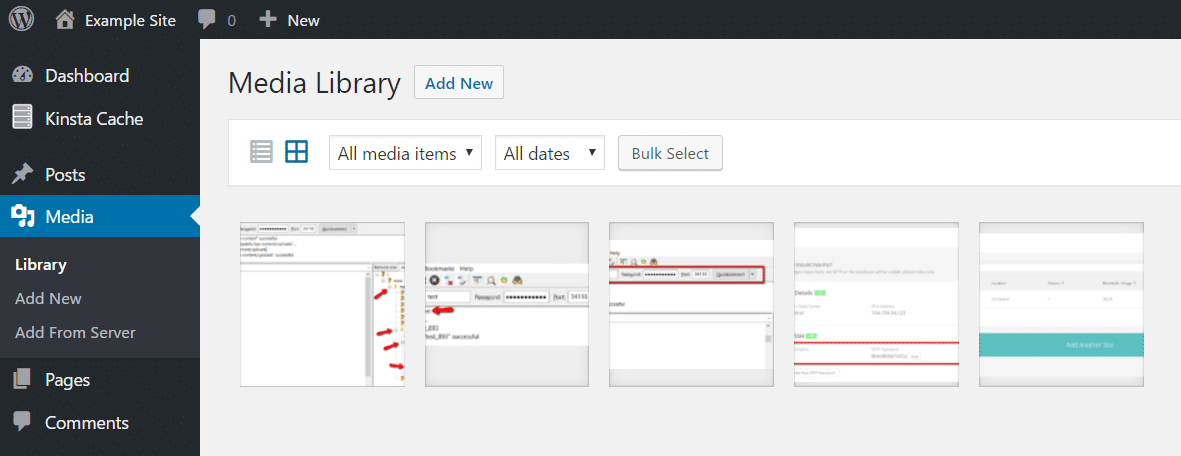
And when you go dorsum to your media library, you should see all of the files yous uploaded via FTP:
That's it! You're done at this indicate. That's all y'all need to do to bulk upload files to your WordPress media library. (recommended tutorial: iv Handy WordPress Media Library Hacks)
Alternatives
Here are a few alternatives you could besides use to bulk upload and register files within your WordPress media library.
- If you'd like a plugin with a fiddling more complex functionality, yous can effort the gratuitous Media from FTP plugin. The main reward of this plugin is the ability to schedule the import process to run automatically. Unless y'all specifically need this functionality, though, it's more often than not safer to stick with the manual approach offered past Add From Server whenever possible.
- You can too apply the premium WP All Import plugin to import images from your server.
- If you lot want to practise it straight from the command line you can import images using WP-CLI. The
wp media importcontrol allows you to create attachments from local files or URLs.
Salvage fourth dimension, costs and maximize site performance with:
- Instant assistance from WordPress hosting experts, 24/7.
- Cloudflare Enterprise integration.
- Global audience reach with 29 data centers worldwide.
- Optimization with our born Application Performance Monitoring.
All of that and much more, in i plan with no long-term contracts, assisted migrations, and a 30-day-money-back-guarantee. Check out our plans or talk to sales to find the programme that's correct for you.
Source: https://kinsta.com/knowledgebase/bulk-upload-files-wordpress-media-library-ftp/
Post a Comment for "upload product images to uploads sub folder woocommerce"